Thursday, May 2, 2024

Style Arc Montana x 2


The Montana dress is a popular pattern from Style Arc. The original pattern is similar to this version in blue, with a round neck, extended shoulder that forms a little cap sleeve, and slightly flared skirt gathered onto a high-waisted bodice. No darts on the original pattern.

Two shibori-look print cottons from Miss Matatabi were used for my first version. The pattern intends for you to make a self-lining for the bodice but since I didn't have enough fabric, this one has bias facings on the neck and armholes. 

On Babette it looks like this is a maxi length. That's not accurate; it's more like a midi, although a maxi would be a possibility in the future. The skirt length is the same as the pattern, not altered. Poor Babette is old enough that she keeps returning to her factory settings. I can't make her tall enough or adjust any of her vertical measurements to match me anymore.

I selected my size using my measurements and the sizing charts. This is meant to be a loose style. The 3/4 view shows that there is no shaping to the bodice. Everything hangs straight down.(That is not meant as a negative.)

Easy fit - no shaping

Version 2 was made using the expansion pack for Montana, which includes several different necklines and sleeve variations. This one is in linen, also sourced from Miss Matatabi. For this version, there was enough fabric to do the self lined bodice, which is a great way to finish sleeveless styles. There is no facing to roll out and fuss with, and no topstitching. Nothing against topstitching, but sometimes you want it and sometimes you don't.

The pattern instructions for doing the self-lining will work, but it seemed easier to me to use a burrito method. Sew the neckline (with the collar sandwiched between the layers) right sides together. Understitch, turn, and press. Then, making a burrito, stitch the right sides of one armhole together. Again, understitch, turn, press. Then do the same with the other armhole. Lastly join the sides (bodice to bodice, lining to lining) all in one long seam.

I do like this slit neckline with the little stand up collar. This view, along with most of the others in the expansion pack, has armhole darts that don't really add any shape to the dress, but do eliminate armhole gaping. It was a disappointment that the sleeveless versions are achieved by just leaving off the sleeves. Armholes really need to be drafted differently if there is no sleeve. Look how deep that armhole is. I have to own up to that mistake myself, because I really knew better and should have corrected the armhole before cutting out, but it would have been nicer if Style Arc had done that for me.


Showing the deeeeep armhole

I did make one fitting adjustment on version 2: added 3/4 inch to the length of the bodice. It is still high waisted on me, like it is supposed to be, but a little more in proportion with my long ribcage. That means that it also hits me just a bit longer on the leg, because I still did not change the skirt length.

Both these dresses have been laundered 3 or 4 times already, showing that I am wearing them often! They were not pressed for the photographs - the fabric looks good enough without it. 

After decades of wearing only pants, dresses are suddenly appealing again. Very casual styles like Montana are just the ticket for me and there will likely be more in the future. I wore things like this in the 80s and still enjoy them now.

Thursday, March 21, 2024

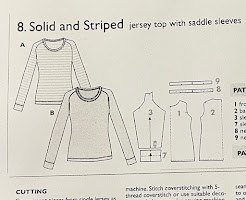
Ottobre 5.2015 #8 "Solid and Striped"

Don't let that moiré pattern make you dizzy!

This dress began with a micro-striped jersey that just seemed to be meant for a raglan or a style with a somewhat similar sleeve. This top in my Ottobre library was the easy winner. The saddle shoulder avoids the dart from neck to shoulder that raglans generally have. 


Although the top could have just been lengthened and the width at the hip adjusted to fit fairly easily, there was a variation of this basic pattern in the same magazine that was a long cardigan with a shaped center back seam. Ottobre collections are often like this, which makes it easy to mix and match the features of related garments to make exactly what you want. 

Combining the two views made my design changes even easier with the added benefit that my dress has the refinement of a little shaping in the back. It makes the dress just a tad less tent-like than what it would have been without the seam. I also shortened the sleeves so they would be elbow length.

Since the stripe in this fabric was so tiny, I didn't make any effort to match across the center back seam.

showing the basic sleeve shape


Here are some views of the shoulder seams. I thought that years ago these saddle shoulders were also called "magyar", but when I google that term now, I don't see this style at all. 


The fabric has two layers to it, giving it a bit more heft and making it better for this simple dress than thin jersey.

I like this a lot! Soft, cozy, comfortable to wear. It pairs well with the Burda jean jacket I made last month. The two understated and neutral patterns look kind of playful together. 


Friday, March 8, 2024

Love Notions Tidal

This pattern was purchased specifically because of a video posted by Karina Trinidad to her channel Lifting Pins & Needles. I really like interesting back views and loved the chevron effect in the back that she demonstrated. 

Tidal is a fit & flare type of style without side seams. The back pieces wrap around to meet the front forming princess seams. It's an interesting design.

Once I had the pattern I was on the lookout for something stripey to make the back chevrons. This ITY from Fabric Mart was appealing with the scrolling paisley design. Another YouTube style influencer has recently advised in one of her "how not to look old/frumpy" videos to quit wearing paisley, but there are really a limited number of print motifs that I like and paisley is one of them. In fact, there's another paisley dress on the cutting table right now. đŸ˜„ Us old hippies will never give it up.

Changes to the pattern: my measurements would have put me in a L, but I sized up because I do not like negative ease and cut an XL, blending to 2X at the hip. Raised the neckline (which is very scooped) 3/4 inch and lowered the bust point 5/8". I also added 6-1/2" to the sleeves so that they would be elbow length.

This poor old dress form is not even doing a good job for display any more. It won't stay at the height that matches mine, so the photos show how it would look on someone about 4 inches shorter. It also has the upper body longer on one side than the other because it can't maintain the settings for the waist length on one side. And the ITY really shows off every pointy angle where its circumference has been adjusted. Maybe I'll get motivated to figure out a routine for taking selfies wearing my stuff.


The back view that inspired this dress

I do like the way this dress looks and feels when wearing it and could see making it again, but not with the chevrons. That would be too recognizable as the same pattern. The maxi/tank version could be very nice.

After decades of never even considering a dress or skirt, I am on a dress making binge. They are what I want to wear now. There are more on the way!

Wednesday, February 21, 2024

Burda 2.2024 #114


There are two jean jacket styles in the February 2024 Burda magazine. One is this kind of stripped down view, and the other has a collar, flaps on the breast pockets, and sleeves that gather into the cuff. I made the stripped down version, adding the collar. It's great to have a classic pattern like this all fitted and ready to go for whatever fabrication strikes your fancy.

line drawing

It was this issue that convinced me that I wanted to subscribe to Burda again after taking a Burda break for many years, and it was because of this pattern. It wasn't a guarantee that the subscription would start in time to get this particular issue, but lucky for me, it did!

Fabric: this is the first cut to be used from my Miss Matatabi order. Everything in that order is sooo nice, lovely quality, and their shipping was ultra fast. This fabric is a kind of mysterious taupe/celadon/celery color cotton, with woven-in off white dots. The weave was kind of spongey and there was more drape than you want for a jean jacket, so it was underlined with batiste. That provided just a tad more oomph and is so soft next to the skin.


back - the seaming doesn't show much in this photo

Sizing and alterations: traced a 44 for the neck and shoulders, blending to a 46 at the base of the yoke. 46 sleeve. All the torso pieces were lengthened 1", the sleeve shortened by 1", and the bust fullness lowered about 3/4".

Cutting out: it was a real puzzle figuring how to lay out the pattern pieces on the fabric it order for them all to fit and it took hours and hours. Everything was originally traced with 5/8" seam allowances, and I had to go back and reduce them all to 3/8". When that was done, I could just barely get everything cut out except the undercollar. A leftover piece of linen from another project that was really close in color supplied that piece.

almost zero waste


Details: I debated a long time about how visible to make the topstitching and finally decided to keep it low-key. Plain silver buttons kind of recall snaps and look right to me.


gentle shaping, not totally boxy

There is a lot of sewing involved in a jacket like this and a nice feeling of accomplishment when it is all done. I love my little dotty jacket and know that it will get worn often.  AND, this fills in one of my Make 9 squares: "make something from the current Burda".


Wednesday, February 7, 2024

Style Arc Logan Shacket

Why this project? Lighter jacket weather is on its way. This fabric was bought a year ago with a differnt jacket in mind. At first it was meant for the Sewing Workshop Haiku, then later on their Tremont. A window display convinced me that a little less volume would be a good idea. I like back details, like Logan's curved yoke, so it was my pick.
One day those display grids will be stored someplace else

Sizing: straight size 16 based on my full bust measurement.

Fabric: heavy but loosely woven cotton with a lot of texture. Too ravelly for the felled seams intended. I ended up serging and topstitching. It's warmer than I expected and that's a good thing.

to show the texture
Alterations/Modifications: lengthened 1" at the hem. Eliminated the sleeve turn ups by shortening the sleeves 3". The chest pockets are really oversized, so I cut them out without the seam allowance, which reduced the width of each pocket by 3/4". No fancy fitting alterations!

Results: It's a versatile jacket. I really like it and am already wearing it a lot. If I had known how much I wad going to like it, I would have done a Hong Kong finish on the seams.

What's good about the pattern: It's a loose jacket so there didn't need to be a lot of fitting done. It was a little surprising to see how high the sleeve cap was for a style with an extended shoulder, but Style Arc got it right. Those sleeves hang nice and straight with no excess folds or twisting. 

What's bad about the pattern: Not really a pattern fault, but there is a collar stand and that needs to be taken into consideration when choosing the fabric. Mine was thick enough that even though construction of the stand was not a problem, putting a buttonhole in it was. In the end I left the button on the stand but picked out the buttonhole. It would never be worn buttoned all the way up, anyway.

back with deep curved yoke
Denouement: One day I hope to get a photo of myself wearing the jacket to update this blog entry. Meanwhile I wanted to get it written while it was still fresh in my mind. If shackets stay in style, I could see making another one. This would be so nice in a plaid with the yoke on the bias, or with some other treatment that brings more attention to that curved seam.


Sunday, January 28, 2024

Aria Saga

Why? It is time to perfect a new basic shirt pattern. Influenced by influencers on Instagram and YouTube, and because I've been having good results with their knit tops, I decided to try Love Notions Aria.

Sizing: Love Notions has you select your size by your upper bust measurement and then choose between their standard bust or full bust front pieces depending on the difference between your upper bust and full bust. My measurement put me between a Medium and a Large, so I went with the Large standard bust for the first shirt. The finished garment measurements given with the pattern looked fine.

Fabric: lightweight crisp cotton chambray for the first, a more coarsely woven cotton for the second.

Alterations/Modifications: Foolishly, I cut and sewed the first one without making a muslin. Because this isn't a fitted garment, and because I'd been having good results from this pattern line, I thought I could forge ahead and that small tweaks would fix any issues. That was so wrong. 

A try-on of the first shirt without sleeves was surprising. The fit across the upper chest was more snug than I like, but acceptable. That all changed when the sleeves were set in. I thought I took a picture, but maybe I was too upset. The sleeves were all bunched up under the arm, and the front of the shirt would no longer overlap. What a mess. I tried scooping out the armscyes which helped a bit with the bunching, but there still would have been no way to button the shirt.

However, the back of the shirt did not hang up on my tush. This has been a huge point in Love Notion's favor and has been true of the other patterns of theirs that I've made. Because of that, I decided to try again. This time I picked the full bust piece, which included a dart. (One of the other disappointments with shirt #1 were the folds that draped from bust apex to hip.) And I made a muslin.

What a mess.

Not only was the bust point way low, but look at the weird folds around the armscye and the poor fit of the sleeve in general. There was also pulling across the chest from the armpit, like you sometimes get in tee shirts that don't fit. When I released the basting at the top of the sleeve cap, the folds in the sleeve improved. The sleeve cap as drafted is pretty flat. I needed to add about an inch in height.

Here is the strange shape of the armhole. The pulls were coming from the point of the notch, where that odd angle is. Maybe this is typical of patterns for full-busted figures? Feeling frustrated, and with nothing to lose, I decided to redraw the armscye, adding fabric to fill in that weird angle and scooping out to accommodate the extra height I was adding to the sleeve cap.

Huh?

red line shows new shape


That helped.

Results: I completed shirt #2, the pink one, with all the changes, and will wear it. In the photos it doesn't have buttons yet, because I want pink buttons and only have white. It will take a while to find pink ones. I also removed the sleeves (that I had done such a good job on) from shirt #1 because it would be wearable sleeveless. Had to make darts in the armhole because of gaping, and finished those edges with bias tape. I really wanted the sleeves, but at least the shirt isn't a total loss.

left off the buttons towards the neck where it is tight on me

deep back yoke and pleat
no sleeves, alas
The pattern has square corners on the cuffs, I prefer them rounded

What's good about the pattern: Doesn't hang up on the tush! Also, the pattern has excellent instructions for making the sleeve placket and I got my best results ever using their pattern piece and instructions. This alone was worth the price of the pattern.

What's bad about the pattern: I had to do more work fitting this pattern than any other I can remember, including redrafting the sleeve and armscye.

Conclusion: Because of the drastic redrafting I had to do, and because I don't have a lot of confidence in my drafting, and because of the voluminous fit, this is not going to be my new basic shirt. I'm just glad that in the end I didn't totally waste my time and fabric.

shirt #2, better than shirt #1 but not perfect.

pieced the back yoke to make chevrons


Saturday, January 13, 2024

Love Notions Coda


 Deadline sewing is usually not a good idea for me, but circumstances lined up just right to try to make a warm layer before some predicted cold weather arrives. There was a leftover chunk of heavy French terry in the stash, and there was the Coda Coat pattern that I wanted to check the fit on. The terry has zero stretch so the fact that it’s a knit wouldn’t make a difference. 

So here’s a Coda, size L at the shoulders and bust (used the standard bust piece) blended to an XL at the hip. It was lengthened 1-1/2 inches and there is a 3/8 inch forward shoulder adjustment. Added some additional length for a hem. Left off the sleeves to make a vest.

This works just fine with a center zipper, but there is not enough overlap to use a button or snap closing. One day I would like to make the pattern as it was intended, so maybe check out the full bust piece and see if that would solve the problem before making it again. I know how the hips and body fit, now.

The collar is just a rectangle the length of the neckline, after the center front was extended up to make a round neck. (And seam allowances added.)

I made good use of my sewing feet for the topstitching and also did plenty of hand basting, which paid off.  

Critiquing my work, I’d say that the armholes are a little too big, but that means it can be worn over bulky and oversized layers, so I’m not really bothered. 

Bring on those cold temperatures!

Style Arc Montana x 2

The Montana dress is a popular pattern from Style Arc. The original pattern is similar to this version in blue, with a round neck, extended ...